Search This Blog

Showing posts with label swatches. Show all posts

Saturday, September 23, 2017

Swatches & Review: Fenty Beauty Shimmer Stix

I got to swatch all of Fenty Beauty's Shimmer Stix! So I have a light, cool and yellow toned Asian and I use Fenty's Soft Matte Long Wear Foundation in shade #130.


I've been using them for several days now, and so far, I'm happy with them as a blush –they're very smooth and blendable, the pigment is rich, they don't streak......BUT the two colours I got, Yacht Life & Unicorn, ends up with no hint of shimmer when you apply them on your cheeks. I was expecting a highlighter instead of just a blush, so I did end up disappointed.

To see these Shimmer Stix in action, check out the video here where I did arm swatches, face swatches, and wear tests of the Shimmer Match Stix, Matte Match Stix, Pro Filt'r Foundation & Primer, Gloss Bomb, Trophy Wife & Kilawatt Highlighters:


Untuk review dalam bahasa Indonesia:


So here are the ingredients:

Mica, Ethylhexyl Isononanoate, Octyldodecanol, Polymethyl Methacrylate, Sucrose Acetate Isobutyrate, C20-40 Alcohols, Tribehenin, Paraffin, Polyethylene, Vp/Eicosene Copolymer, Vp/Hexadecene Copolymer, Diisostearyl Malate, Cera Microcristallina/Microcrystalline Wax/Cire Microcristalline, Caprylyl Glycol, Phenoxyethanol, Tocopheryl Acetate, Hexylene Glycol, Tocopherol, Isostearyl Alcohol, Ascorbyl Palmitate, Malic Acid, Calcium Sodium Borosilicate, Synthetic Fluorphlogopite, Calcium Aluminum Borosilicate, Polyethylene Terephthalate, Acrylates Copolymer, Silica, Tin Oxide, Iron Oxides (CI 77491), Titanium Dioxide (CI 77891).

I checked the ingredients with CosDNA and they're all good. The only thing that I find amusing is that they use Phenoxyethanol as a preservative, which is as controversial as certain preservatives. But seriously, not all preservatives are bad. You know what's worse? Mold. Mold in your makeup. Yeah.

Friday, July 21, 2017

Review, Swatches & Recommendation: Limnit Lip Gloss

DISCLAIMER: I got these for free, but I was in no way obliged to post a public review & all opinions are mine. Trina did give a 10% off code I can share (WORKINGWITHMONOLIDS), but I do not make any money out of it. :)

Now with that out of the way.....

As you all know, I'm a diehard fan of Limnit and have recommended them before on this blog....as well as many, many, many times on Reddit. I love this brand. So when Trina, the owner, asked me if I'd like to be one of the first few people to try out her new lip glosses, obviously I said yes. 

Atomic Azalea, Fearless Firecracker, Everyday Effervescence


These lip glosses only come in 3 colours at the time being, and here's the description from Limnit:

  • Everyday Effervescence: true yellow-orange lip gloss packed with a mixture of copper, gold, and red shimmer  
  • Fearless Firecracker: red orange lip gloss packed with a mixture of gold, red, and pink shimmer 
  • Atomic Azalea: a slightly warm, watermelony lip gloss with cool pink, purple and red shimmer


So let's get on to the good part first...the swatches!

Atomic Azalea, Fearless Firecracker, Everyday Effervescence


First of all, I'll put a disclaimer right here. I generally don't like glosses since I find them messy and my hair gets stuck in them, but at the same time, Limnit is my favourite brand, so it's hard not to be biased. With that being said, I'll be as fair as possible with my review!

Colour


Ok, my camera isn't doing them justice. They're really sparkly and in real life, I can see the duochrome highlight, especially in Atomic Azalea. These are sheer glosses, and while I normally don't like sheer glosses since my lips are often peeling and sheer glosses highlight this in an unflattering way, this is great for creating that blotted, messy lips look that's so popular in Korea right now.  Here's an example of that look using Fearless Firecracker & Stop And Smell The Roses (new shade!)

Limnit, swatch


Wear


Like all glosses, these aren't really long lasting and I don't expect them to be. They also transfer easily, which again is common for glosses and why I hate glosses. The great thing is that these do NOT bleed and they're not sticky at all, which impressed me. I find that brands have a hard time striking the balance between non-sticky and non-bleedy, and Limnit got it right. So yeah, I'm impressed.

Comfort


10/10. They totally win for this. I mentioned they're non-sticky, but they're so comfortable on your lips too. They're not drying at all, but they don't feel greasy either. For my swatches, I messed up during the video and had to reapply everything all over again. Even then, my lips were ok. It just feels like you're using a lip balm so I'm a huge fan of it.

Ingredients

And comes a slightly boring part that I've decided to start doing in my reviews...ingredient analysis. Here are the ingredients:
Hydrogenated Polyisobutene (and) Ethylene/Propylene/Styrene Copolymer (and) Butylene/Ethylene/Styrene Copolymer, Ricinus Communis (Castor) Seed Oil, Caprylic/Capric/Stearic Glycerides, Tocopheryl Acetate (Vitamin E), Microcrystalline Wax, Euphorbia Cerifera (Candelilla) Wax, Simmondsia Chinensis (Jojoba) Oil, Butyrospermum Parkii (Shea) Butter, Ozokerite Wax, Fragrance, Theobroma Cacao (Cocoa) Seed Butter, Cetyl Alchol, Copernicia Cerifera (Carnauba) Wax, Cannabis Sativa (Hemp) Seed Oil, Ascorbyl Palmitate (Vitamin C); May Contain: Titanium Dioxide (CI 77891), Iron Oxides (CI 77491, CI 77492, CI 77499), Blue 1 Lake (CI 42090), Red 7 Lake (CI 15850), Red 28 Lake (CI 45410), Red 40 Lake (CI 16035), Yellow 5 Lake (CI 19140), Mica (77019), Tin Oxide (778161), Synthetic Fluorophylogopite (77019), Silica, Calcium Sodium Borosilicate

As you can see, these are vegan and as always, cruelty-free. Quick check with CosDNA shows that everything's safe & non-irritating, though some of the more acne prone may want to watch out for the cocoa seed butter. I'm acne-prone myself, but I've been using them for a week and haven't had any issues so it's not something I'd worry too much about.

These glosses are definitely rich in butters and oils, and I suspect that's why they're so comfortable to wear. So A+ for formula!


Would I repurchase? Yes.

So for those of you who prefer watching a video and want to see videos of face swatches, here's the video I posted on YouTube:


Oh and bonus swatch of a new Limnit lipstick shade, Stop And Smell The Roses:


Sunday, November 13, 2016

Review & Swatches: Emina Creamattes

I love supporting my local brands, so I decided to give Emina Cosmetics a try! I bought all 7 shades of their Creamattes from Sociolla, and they were a steal at Rp 45,000 (~US$ 4) each. I had so much fun unboxing everything and doing my first ever unboxing video!


Sociolla Review

I got my items within 3 business days. There was a bit of a hiccup in my order though. So, Sociolla is hosting a competition, and to participate, we have to take a picture with the Emina postcard they sent. I didn't receive the postcard and many people didn't either. Fortunately, Sociolla sent the postcard 2 days after I contacted them on their instagram page, so that's awesome.

Emina Creamattes Swatches

Fuzzy wuzzy, frostbite, tumbleweed, jellybean, flamingo, choco lava, mauvelous


Fuzzy wuzzy, frostbite, tumbleweed, jellybean, flamingo, choco lava, mauvelous


Emina CreamMattes Review


Price: Rp 45,000 

Pigmentation: Great pigmentation, some of the brighter colours like Frostbite and Tumbleweed do end up looking a bit streaky with just one coat, but it builds up pretty easily.

Texture: Like a creamed lipstick when wet, and feels really sticky while it dries. It takes a long time to dry (several minutes), but dries to a comfortable, powdery matte. 

Longevity: Starts disappearing around the inner parts of your lips within 3-4h, doesn't really last through a meal and will start smudging. 

Buildable? Yes

Drying? Moderately. Relatively drying compared to lipsticks, but not as drying as some liquid mattes. It feels slightly more drying than Jeffree Star's liquid mattes or NYX's cream mattes. 

TL;DR: I love these, they're AMAZING value for money and even have really bright or less conventional colours that are rarely found in Indonesia. You do have to touch up throughout the day, but they're very buildable so it's easy to touch up. 

Would buy again? YES!


SaveSave

Friday, October 7, 2016

Review & Swatches: 6 Eccentric Cosmetics Liquid Matte Lipstick

Eccentric Cosmetics makes the BEST eye primer ever, so when I heard a reformulation was happening, I panicked and went shopping ASAP. That's how I ended up buying a bunch of their liquid matte lipsticks (er....I was saving on shipping?). Kilimanjaro was included as a free sample (I really went nuts shopping), but everything else I bought oh my own.

So here are the swatches of the 6 liquid matte lipstick shades I got!


Formula-wise, they're really drying like most mattes. Wear time isn't that great for how drying it is –a couple of hours only and won't survive through a meal. A couple of colours are unfortunately streaky, and this is something I noticed in Eccentric Cosmetics' darker colors since I first started purchasing these. That's why I tend to try a sample out first for the dark colours. The good thing is that the streakiness isn't too obvious when zoomed out!

The two metallic colours, Salar de Uyuni and Door to Hell are just for fantastic. I can't properly capture how metallic they look, it's just soooo gorgeous and I wish I got Door to Hell in a full size! They go opaque and smooth with just one swipe, so these are really winners formula-wise. Oh, and if you rub them, more of the metallic gold will pop out!

Notre Dame is another favorite of mine. It's really sheer, but that's what makes it amazing for layering. Just dab it in the middle of your lips and instant gorgeousness!

Sunday, January 10, 2016

Review, Swatches & Recommendation: Femme Fatale's You Choose the Scare...Vol 2 (12 Colours) + 2 Extra Colours

Sorry for the lonnnggg break. I just got back from my vacation and things have been crazy at work! Anyway, I recently got Femme Fatale's You Choose the Scare... Vol 2, and only just got around to swatching thanks to procrastination >.<

The collection contains 12 eyeshadows, 2 blushes and 1 highlighter, and I received 2 extra free samples (Jelly Sandals, Kitten Mittens). So for this review, I'll be swatching and reviewing 14 eyeshadows and saving the blush & highlighter reviews for later since I still haven't swatched those.

This is my first time reviewing Femme Fatale, and before I get to the review, I have to show you guys these awesome macro shots.


Eyeshadows Review


Femme Fatale is known for really gorgeous duochromes and they definitely earned the reputation. The shifts are all so strong! What I like is that these eyeshadows are still pretty easy to use over primer alone. They definitely don't look as pretty as when over a glitter adhesive, but they're still usable and, as you will see from the swatches below, the shift can still be seen. The formula's really smooth and blends easily, though some of the duochrome goes bald during blending. For most of the formulas, it doesn't go completely bald though, so you still get a bit of it –it's similar to My Pretty Zombie's duochromes.

I did face some issues with certain colours, which I'll discuss in further details in the individual colour reviews below, but there were way more colours with great formulas.

I ordered sample sizes of these, and one thing I noticed is that the sample amounts look inconsistent. I can't be completely sure since I don't have a weighing machine that can accurately weigh such small amounts, but from the look of them, some samples seem to contain way less eyeshadow than what I normally get from indie samples, and some contain roughly the same amount as smaller indie samples.

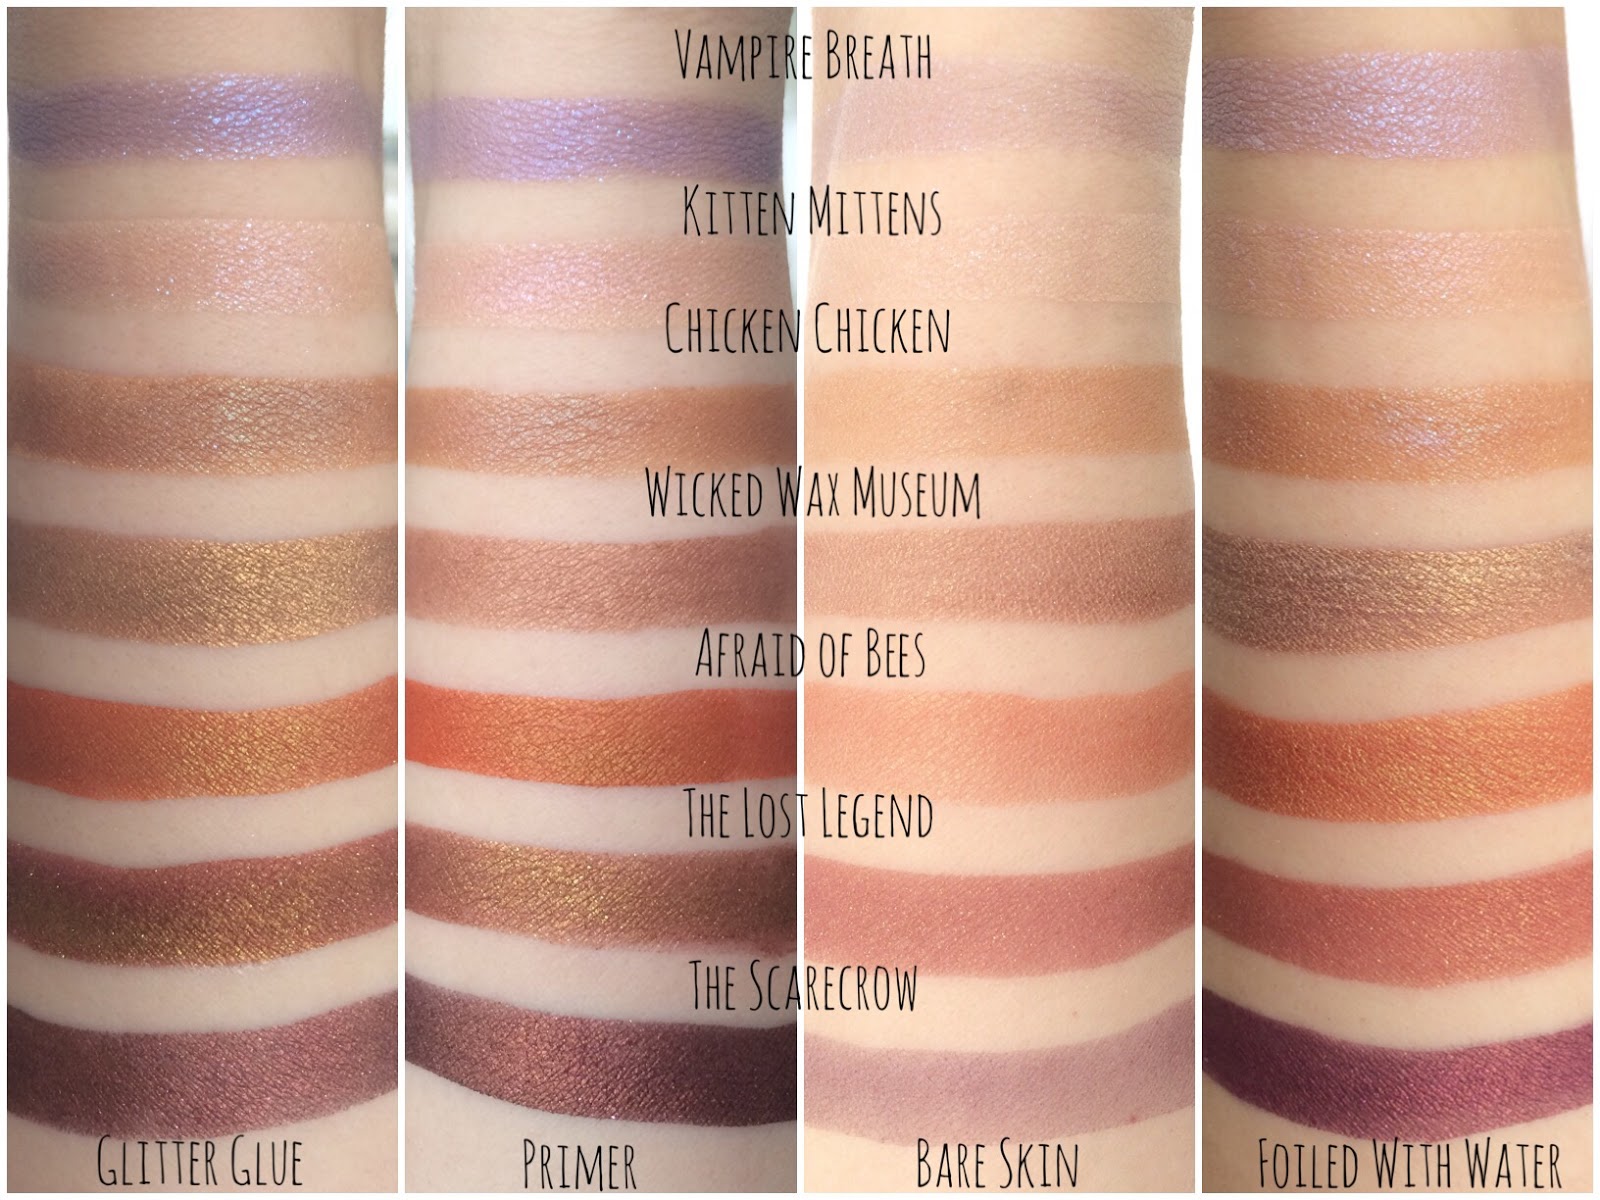
Overall, this is definitely a brand I'd recommend to even beginners since the formula's relatively easy to use! So on to detailed swatches! I've swatched over natural light for colour accuracy and under yellow-toned artificial light to capture the shifts that may appear better under a direct light source.

Under Natural Light


Jelly Sandals, Fever Swamp, Ghost Beach, Camp Nightmare, Dead House, Curse of the Mummy, Beast From The East

Jelly Sandals runs slightly sheer, even over primer. It's a gorgeous colour for layering or highlighting though. I usually use two layers of this colour (first over primer, then a second layer over glitter glue) to get the colour out.

Fever Swamp is so pretty over glitter glue! It also runs slightly sheer though, and the shift tends to get lost if you're not using glitter glue.

Ghost Beach is so vibrant and gorgeous! It surprises me by performing relatively well over bare skin. Runs slightly on the sheer side and can get lost when blended.

Camp Nightmare is one of my favourite colours just because it's so bright and vibrant. Runs slightly on the sheer side, but not as bad as Ghost Beach.

Dead House's blue shift over primer is actually more obvious in person than what the swatch pictures can capture. It tends to stain though, and I don't recommend foiling it with water because the the colour bleeds.

Curse of the Mummy just wouldn't foil with water. No idea why. Maybe there's something hydrophobic in there, which leads to streakiness? It also tends to go chalky over primer. I definitely struggled with this colour, but it's only one out of the batch of 14 colours, so I think it's just a one off thing. It's my least favourite formula out of the entire collection.

Beast From The East is another colour with a very obvious, dramatic shift that the primer photos just can't capture. The shift is slightly pressure sensitive, but it still shows up really strongly over primer alone! You'll see what I mean in an EOTD below.


Vampire Breath is super sparkly, and it makes me wonder if it's a nod to the sparkly vampires of Twilight. It tends to go bald pretty easily and leave behind just a sheer wash of bluish highlight with a slight purple tint. If you don't mind the glitter, you can totally use this colour as a highlighter because it's sheer enough.

Kitten Mittens is a sparkly beige, but I can't capture any of the sparks outside swatches. When applied on my eyes, it turns into a plain, satin beige. The colour is really close to my skin tone, so it ends up almost invisible.

Chicken Chicken has a stronger greenish shift than what the swatches show. I was definitely surprised how bright the green shift was on my eyes!

Wicked Wax Museum is definitely pressure sensitive and I found that the colour tends to show up as plain brown. You can get a bit of the gold shift over primer only, but it tends to blend into the colour so it looks like a plain metallic brown. Wicked Wax Museum, The Lost Legend and Afraid of Bees have the same gold shift, so they can kind of look alike when foiled or used over glitter glue.

Afraid of Bees has a strong gold shift and it shows up fairly well over primer alone. It's slightly pressure sensitive, but sturdy enough that you're not obliged to use glitter glue to get the gold shift.WWicked Wax Museum, The Lost Legend and Afraid of Bees have the same gold shift, so they can kind of look alike when foiled or used over glitter glue.

The Lost Legend is gorgeous and the shift is definitely strong! It's also pressure sensitive and can go bald on the parts of my lids that creases, but the shift's ability to stay put over primer alone is as good as Afraid of Bees'. Wicked Wax Museum, The Lost Legend and Afraid of Bees have the same gold shift, so they can kind of look alike when foiled or used over glitter glue.

The Scarecrow is a colour that I find looks best foiled. I was wondering why it kept coming out as brown when I used it for one of my EOTDs, until I started patting it on with water. That's when the red exploded out. Definitely foil this one!

Under Yellow Toned Artificial Light


Jelly Sandals, Fever Swamp, Ghost Beach, Camp Nightmare, Dead House, Curse of the Mummy, Beast From The East


EOTDs


The Scarecrow and Wicked Wax Museum Over Primer & Foiled


The Scarecrow was initially over primer alone, but it became this dark brown colour. I finally added another layer of it foiled with water, and it looks way better. Wicked Wax Museum is foiled on the waterline.


Chicken Chicken, Afraid of Bees, The Lost Legend & Wicked Wax Museum Over Primer


Chicken Chicken's the main part of the look, and check out how strong that green shift is! Afraid of Bees is on the inner corners and while the shift is lost thanks to creasing, it's still a really vibrant orange. Wicked Wax Museum is on the lower lashline and The Lost Legend is blended on top of the look.


Kitten Mittens, Ghost Beach, Fever Swamp & Camp Nightmare Over Primer Only


Kittens Mittens is there in the inner corner, but it kinda just disappears. Ghost Beach is foiled over the inner lashline. With just a layer over primer, Fever Swam and Camp Nightmare's kinda sheer. I did another EOTD to show how much better these colours would look over glitter glue...


Dead House, Beast From The East, Ghost Beach & Camp Nightmare Over Glitter Glue & Primer


See how much better Ghost Beach & Camp Nightmare looks here? For this look, I used 2 layers of them –first over primer, then over glitter glue. Dead House is blended above Ghost Beach & Camp Nightmare on the lids and Beast from the East is on the outer lower lashline. 


Wicked Wax Museum & Afraid of Bees Foiled With Water


This is what I'm talking about when I mentioned that Wicked Wax Museum and Afraid of Bees can kind of look alike when foiled or used over glitter glue. They're both blended on my lids, with Wicked Wax Museum in the inner half, and Afraid of Bees on the outer half.

Beast From The East Over Primer Only


See how awesome the shift is over primer only? Sorry for the unfinished look! This is part of a tutorial and not a finished look at all!

Thursday, December 3, 2015

DIY Cosmetics: The Crucible Collection

I recently got access to a lot of TKB's micas and pigments, so I thought I'd review them here. For the first in this series, I'm reviewing their Metallic Collection. TKB Trading's Metallic Collection is a collection of "pure metallic pigments (no mica, no titanium dioxide, no iron oxides or dyes)." Depending on the amount you buy, they cost about  $ 0.19-0.28/g individually, or $ 0.17-0.25/g as a set of 4.

These are the colours in the collection:

Crucible Gold
  • Ingredients: Bronze Powder, Silica
Crucible Khaki
  • Ingredients: Copper Powder, Zinc, Silicon Dioxide 
Crucible Red
  • Ingredients: Copper Powder, Silicon Dioxide
Forged Gold
  • Ingredients: Copper Powder, Zinc, Silicon Dioxide
These colours are approved for use on lips, eyes, and face, so you can pretty much use it all over your face. Another great thing about these colours is that they're really great on their own. You can pretty much use them on their own as eyeshadows, and they adhere well on their own, even without a base.

Here are arm swatches:


Under natural light, over Eccentric Cosmetics' primer

Under natural light
Left: Over bare skin
Right: Over Eccentric Cosmetics' primer

As you can see from the side by side swatches of these colours over primer and bare skin, while a primer do give them more of a vibrant shine, they look pretty good without a primer too!

You can also easily mix them up with a clear polish to great gorgeous colours:


Mixed with Sally Hansen's base coat, photographed under natural light


You can either dust them on your lips for some colour, or mix them up with Vaseline/lip balm/TKB's lipstick base/Life's Entropy's Placebo to create a lipstick/lip gloss. Here are swatches of the colours mixed with Vaseline:


Face swatches for the lips!


So now, DIY time...let's take a look at how they affect eyeshadow blends. These metallic colours create a sort of metallic "duochrome" effect. It makes any eyeshadow look sooo luxurious!

I've mixed them into some existing eyeshadows I have, and here are swatches of the original eyeshadow (top) + the Crucible micas (bottom) so you can get a rough idea of how these pigments change your formulations:

Under natural light, over Eccentric Cosmetics' primer

Under natural light, over Eccentric Cosmetics' primer
Here's some of the crafting tips I have for these:

  • These pigments are pretty opaque on their own, so they're great for making sheer eyeshadows more opaque and fixing patchy eyeshadows. 
  • They do darken the colours so watch out for that.
  • As you can see, the effect's rather lost on browns, and it's most dramatic against a darker base. You can still create ethereal looks with lighter colours though. 
  • I personally prefer something in between a 1:2 - 1:1 ratio for Crucibles:Colour. Since these pigments are pretty opaque on their own, if you have too much of them, they tend to dominate the colour and you'll end up with mostly metallic gold/red.
  • You can mix these into duochrome eyeshadows and still see the duochrome shift, but you'll probably need to add in more of the duochrome highlight if you want a more dramatic shift.
So there you have it! Hope you have as much fun with these pigments as I did!

Thursday, November 12, 2015

Review & Swatches: Aromaleigh's Fatalis Collection (10 + 2 Colours)

I finally got my Aromaleigh order! 


I ordered all 10 colours from the colour-shifting Fatalis collection and finally finished with swatching. I also got 2 free samples, and I'll be swatching them in this post as well, since I don't see the point of creating a whole new post for just 2 swatches. 


Before I get on to my review, I need to address the controversy around Aromaleigh.

Aromaleigh Controversy Discussion


Aromaleigh is a brand that popped up several times in people's blacklists, so I've included that in my IMAM blacklist page. The reason for this is because they previously sold eyeshadows containing [unsafe] [ingredients], and known for terrible customer service.  The owner was also known for harassing any negative reviewers.

They hired someone else to handle their customer relations now and there haven't been any complaints since 2010, even though the owner's still the same person. I was enamoured by the Fatalis promotinal pictures and thought that was long enough to to give them a try again, so I decided to place an order.

After my blacklist went public, several users contacted me to inform me that they experienced intimidation or unprofessional behaviour from the owner too via PM on reddit over bad reviews. A blogger I highly respect also told me her story and gave me permission to share the PM (with her name removed):


Here's a screenshot of the post in question:


Unfortunately, I already placed my order. I'm personally no longer comfortable with supporting this company, so I will not be making further purchases.  

EDIT 13 Nov, 2015: A few hours before I posted this review, Etherealize Me posted a review and swatches of the Fatalis Collection as well. Her review was not negative, but it wasn't glowing either, and for this review, Aromaleigh has kicked her out of the Aromaleigh private group without any notification. The Reddit thread where I posted this review also got brigaded. Looks like what people have been telling me is true, and Aromaleigh is still intimidating & "punishing" anyone who gives them a less than glowing review. I'll be updating my blacklist to state that her actions were not a thing of the past and something that's still happening today. 

EDIT 17 Nov, 2015: This edit came so late since I was traveling and had to check with Etherealize Me first. Aromaleigh had announced that they were deleting the private group anyway, and no one was kicked out of retaliation. However, the group was deleted 4 hours after she was kicked out and an hour or so after I reported the incident in my edit. Of course, I've also been blocked from Aromaleigh's instagram page as well.

Fatalis Collection Swatches


So for my swatches, I'm doing something different from my usual swatches and review. First of all, I won't be doing macro shots because I find that the shift gets lost in the macro shots, and it just looks like a plain, shimmery shadow. Instead of lining up all the colours in a row so you can check for potential dupes, I decided to break the swatches up to individual colours instead. This is because the shifts are only seen at certain angles, so in every arm swatch I did, I can't get a single shot that shows off every colour's shifts. Plus, I could only swatch 3-4 colours at a time since I need to swatch over the skinnier & more curved part of my arm to get the shift out. 

I'm also only swatching over Eccentric Cosmetics' primer and Fyrinnae's Pixie Epoxy too, instead of including bare skin and foiled with water swatches because these eyeshadows are pretty steep at $1.25 for 1/16th of a teaspoon. That's about 1/4 - 1/2 of the typical indie eyeshadow sample. Besides, the Aromaleigh's site also states: "As always, I recommend a regular cream base such as NYX cream eyeshadow base."

I figured bare skin swatches aren't ideal. 

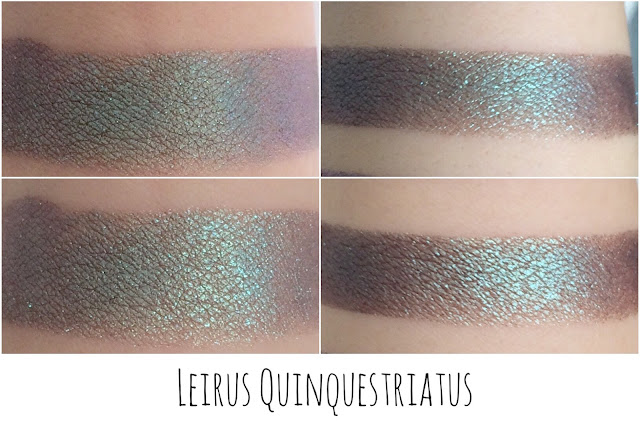
Without further ado, here are the swatches arranged according to colour. Left is over Fyrinnae's pixie Epoxy and right is over Eccentric Cosmetics' primer. All swatches are done at various angles under natural light:


phoneutria nigrivenier

helleborus niger


phyllobates terribilis


amanita muscaria


hapalochlaena lunulata
nerium oleander

dendroaspis polylepis


atropa belladonna


chironex fleckeri

leirus quinquestriatus


General Eyeshadow Review


The shift in the Fatalis Collection is definitely strong and I do think they great. Eccentric Cosmetics' primer is amazing so these eyeshadows look great over that primer alone. They're slightly more sheer over primer alone, but you can get around it by using an eyeshadow base or eyeliner underneath (I'll show it in pictures below). 

I really should be more excited over these eyeshadows, but I admit I ended up rather disappointed. I pre-ordered this collection thanks to these promotional pictures:

Image courtesy of Aromaleigh

As you can see, they swatch nothing like that. Now, I'm familiar with TKB's Moon Dust or Planetary pigments, and even shared recipes for creating colour-shifting eyeshadows using the Planetary pigments. The promotional pictures look so much more stunning than what I'm used to, so I thought they're using more intense, more expensive, and not so easily available colour-shifting pigments. That's why I didn't mind paying the higher price.

After I got them, I discovered they're pretty much the same as Fyrinnae's Arcanes in terms of performance, only much more expensive, so I guess I was kinda disappointed. 

Here's a comparison of prices for other indies with colour-shifting eyeshadows:

  • Aromaleigh: $7.25 for about 0.5 teaspoon
  • Fyrinnae: $8.25 for 1.5 teaspoon* 
  • Hello Waffle: $5.27 for 0.75 teaspoon**


* Picking the most expensive option.
** Using a CAD/USD rate of $0.75

Converting everything to 1 teaspoon, this is how every brand's colour shifting shadows cost for 1 teaspoon:

  • Aromaleigh: $15 
  • Fyrinnae: $5.5
  • Hello Waffle: $7.03


As you can see, Aromaleigh is much, much more expensive than all the other brands. Unfortunately, I don't think it's special enough to justify the price difference. Oh, and here's what the fine print says:


Screenshot taken on Nov 12, 2015
Yeah, I think I rather just go ahead and photograph these eyeshadows in the most realistic conditions instead of setting up a crazy light set up just to get the most intense photos.

Objectively, I think these eyeshadows are pretty and I'm happy with their performance over primer alone. I'm really happy the shift shows up, even over primer alone. However, if their swatches are just more realistic, I think I would've been satisfied with my purchase rather than disappointed and let down.

EOTDs


Chironex Fleckeri over primer only


As you can see, the shift shows over primer only. IRL, it looks a bit sheer, but it's opaque enough for me to skip the glitter glue on most days. 


Phyllobates Terribilis over Fyrinnae's Pixie Epoxy

Yes, this is one of my IMAM Challenge looks!
To get this opacity, I first patted on the eyeshadow over Eccentric Cosmetics' primer, then I applied Fyrinnae's Pixie Epoxy over it before patting a second layer of the eyeshadow.

Nerium Oleander over NYX's Jumbo Eye Pencil in Slate

This is from my IMAM challenge looks again XD

If you want the eyeshadow to be really opaque and you don't have a glitter adhesive, one thing you can do is apply the eyeshadow over an eyeliner or eyeshadow base! I found that for the best results, you should apply primer over the eyeliner/eyeshadow base before applying the eyeshadow.

Swatches & Review of 2 more Aromaleigh Shades


Angrboda is really buttery smooth texture-wise, but as you can see from the swatches, it tends to streak. You can pat it on and slowly build it up, but it doesn't blend out very well and has the tendency to cling on to my pores and emphasize them when I attempt to blend or sheer it out. I say attempt since it doesn't blend out that well. Here's an EOTD to show you what I'm talking about:

Angrboda is the grey, Ciriatto is the black


It was supposed to be a smokey eye and I was using a stiff brush to blend it out. I definitely recommend using an skin-coloured eyeshadow underneath this to prevent the eyeshadow from clinging to your pores.


Ciriatto is pretty, but I'm really having a hard time getting the same colour I get on swatches on my eyes. When applying it on my eyes, all the duochrome seems to get rubbed off and I end up getting a plain black eyeshadow as you can see from the previous EOTD. In the EOTD below, Ciriatto is on the outer 1/3 of my eye, but you can see it just looks black:


This is over Eccentric Cosmetics' primer too, which can usually bring every shift out. Here's a picture of the work in progress, so you can see how Ciriatto looks like, even when I haven't blended it on: