I made an order from
Chinovi sometime ago but only got around to reviewing them now. Here's what I got:
- Brow Powders (Dirty Blonde, Medium Brown, Deep Auburn, Dark Brown)
- Eyeshadows (Pool Party, Vulcan, Vesta)
- Blushes (Bianca, Gidget, Jocelyn)
And I got a free sample of Doww!
For this review, I'm only reviewing the brow powders since a) I'm having a break out so I can't swatch the blushes on my face since I'm using minimal make up to avoid further angering my face, & b) I'm adding a mini tutorial on mess-free brow powder application, so this post is getting long.
___________________________________________
Customer Service
Vanessa was great! So the international shipping amount was a bit high, which often happens when websites calculate shipping amount by total purchase price. Vanessa actually manually invoiced me so I get charged the right amount. Here's the TAT:
- Paid: July 12
- Shipped: July 21
___________________________________________
Brow Powders Swatches
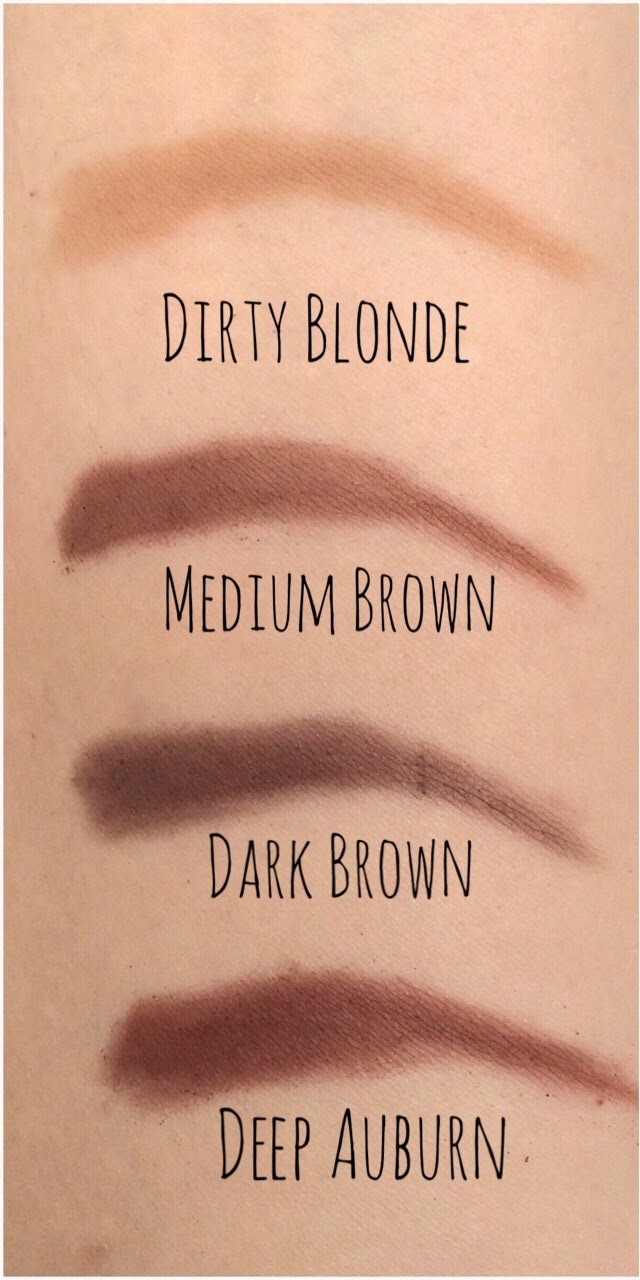 |
| All done over bare skin, taken under natural light. |
I'm loving the smooth texture! Brow swatches:
 |
| If you guys are wondering why I got Dirty Blonde, I used to have blonde & red ombre hair and wanted to do blonde & red ombré eyebrows. |
Unfortunately, these are how they look like on me zoomed out:
 |
| Yup, very, very little difference between them thanks to my dark brows. |
Now I know why brow mascaras are more popular in Asia, it's just that Asian hair is so dark, you have to coat it with a mascara to cover the natural colour of your hair. Dark Auburn is actually a perfect match for my current hair, unfortunately, it doesn't hide my darker natural eyebrow colour. I'd love a brow mascara in this exact shade though!
___________________________________________
Formula Review
Like all other brow powders out there, there's tons of fall out. That's why I find it a bit hard to use, and kind of frustrating when I have my eye make up perfect...and then the brow powder falls on it and ruins it. I also notice fall out when you're trying to blend, but it could be because some of the brow powder gets on the hair instead of the skin, and brushing out your brows cause them to fly out in a puff all over your face. I've included a mini tutorial on how to get around this problem below.
The annoyance of brow powders in general aside, I love the formula of these brow powders! They're great on bare skin and apply so freaking smoothly. So guess what I used them as?
Yup. That's Medium Brown blended with Dark Brown on my lids, over bare skin. No primer whatsoever. They last me 12+h though it does get faded. Here's the full face look:
 |
| Ignore the lips...I got an insect bite at this time so I ended up looking like I'm a cheap idiot who decided to get lip injections for only 1/4 of my lips. |
Ok, now I need to discuss something I noticed with the ingredients. So initially, the ingredient list can only be found on my actual products and the ingredient list on the site is a bit unclear. Here's the only mention of the ingredients:
 |
| Screenshot taken on 10 June, 2015 |
I bought this before I learnt the importance of looking at ingredients, so I didn't notice. As you can see on the products picture above, the ingredient list on the actual products simply says: Mica, Iron Oxide. So it looks like nothing is omitted, but I had to check with Vanessa anyway and she confirmed it's correct:
Now, I'm confused about how something so simple could have a better formula than all the indie mattes I've tried before, so I decided to do some experiments to see if you can get such an awesome result with just sericite mica and iron oxides. Unfortunately, I don't have access to plain sericite mica in such a short time so I had to use treated sericite mica, but h
ere's the results of the experiments with treated serircite mica & a quick & easy DIY matte eyeshadows guide!
TL;DR: yes, you can make a matte eyeshadow by just grinding
treated sericite mica with iron oxides, BUT your colour options.
___________________________________________
Fuss Free Brow Powder Application Tutorial
Ok, this is my preferred method of applying brow powder without having a rain of powder ruining my make up. First, select the foiling medium of your choice. Here are some options:
- A foiling medium like TKB's Mineral Wetliner/Darling Girl's Foil Me – I only own TKB's mineral wet liner, and it gives that slick, liquid liner sort of effect. I personally find it too unnatural for my brows (see pic wayyy below)
- Water – May not work for formulas heavy on oil dispersible titanium dioxide, which ends up having a water-proofing effect. You can check out my review for Daisy Bird eyeshadows, where I ran my eyeshadow covered hand under running water, to see what I'm talking about.
- Alcohol – Some people are against this because it's harsh & drying for your skin, but personally, this gives me the perfect balance between adhesion & blendability. Oh, and I'm a tad of a germaphobe and I already sterilize my brushes before use, so adding a bit more alcohol doesn't bother me.
Mix the powder with the foiling medium of your choice to get the right consistency for you. Go with a consistency you're comfortable with. There's no "right" consistency for this. Some people like very bold, slicked back brows and may prefer a wetter consistency, some people may want a lighter touch and have a more powder-like texture.
I usually work on the cap of one of my eyeshadow tubs:

If you're using alcohol, you can pretty much dampen your brush with it's good to go. This is why it's my favourite "foiling" medium. Once your brush is damp from the alcohol, tap it into the brow powder, then tap off the excess powder before using it.
And now you can apply it with no fall out!
Oh, and I'm sure some of the craftier ones will ask this....
Since you mentioned actual foiling mediums has a liner effect, can I mix the brow powder with it and turn it into a sort of brow mascara?
I did give it a try.
 |
| I mixed it on my hand since I don't have an eyeshadow cap big enough for my spoolie. |
I used Dirty Blonde since the effect would be most obvious and mixed it with TKB Trading's Mineral Wetliner.
 |
| I added more pigments after this but forgot to take a picture >.< |
As you can see, it doesn't coat my brows at all, and ends up sinking to the skin. So nope, you can't use a loose shadow foiling medium to create your own mascara.


